
Push Jerk CrossFit
In CrossFit, efficiency and explosiveness are key to mastering complex movements, and the push jerk CrossFit is no exception. This powerful movement, which combines strength, speed, and coordination, is a staple in CrossFit programming. Whether you’re aiming to improve your overhead lifts or boost your overall fitness, learning the proper form and benefits of the push jerk can propel you to the next level. This article will delve into everything you need to know about the push jerk, from technique to the advantages it offers in your CrossFit journey.
Table of Contents
What Is a Push Jerk in CrossFit?
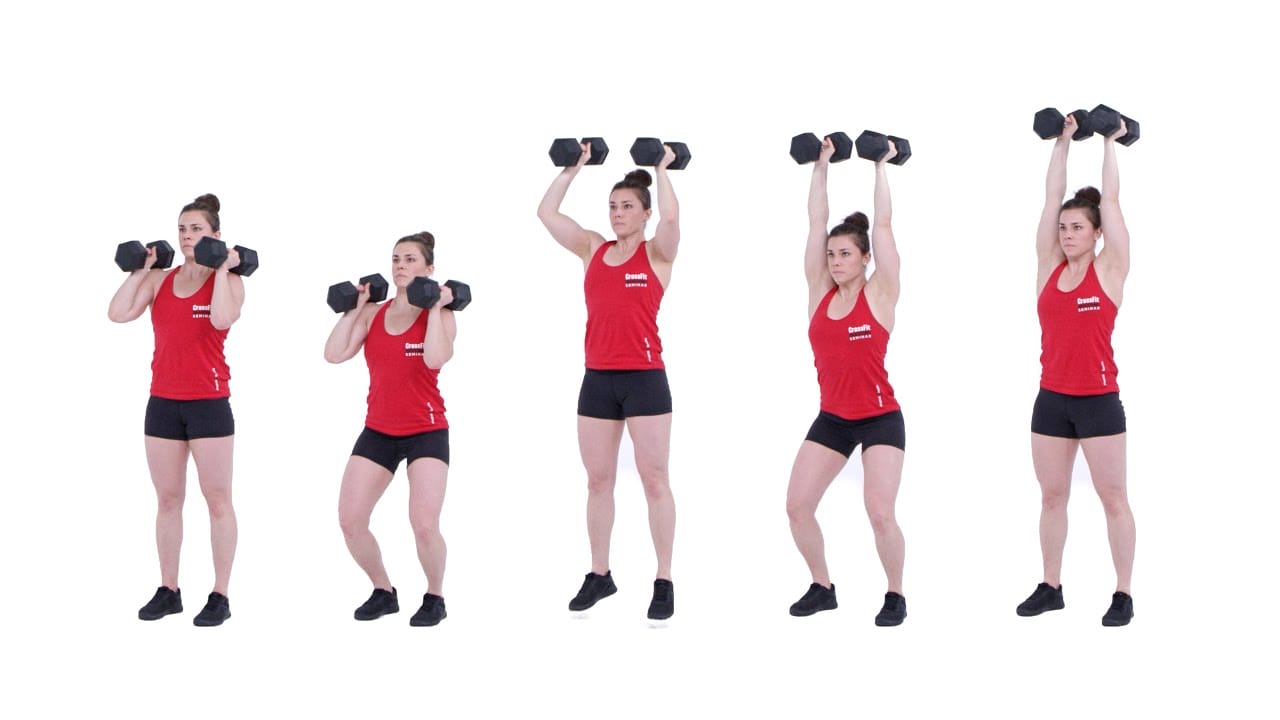
The push jerk CrossFit movement is a variation of the jerk, an Olympic lifting movement used to get a barbell from the shoulders to overhead. It involves using your legs and arms in a coordinated fashion to “jerk” the bar overhead. The push jerk requires a dip, drive, and a powerful extension of the hips, followed by a dip under the bar to catch it in a stable overhead position. The movement allows athletes to lift heavier weights than a strict press or push press due to the utilization of the lower body.
Pro Tip: Unlike the push press, where you use a single dip and press to push the weight overhead, the push jerk involves a second dip under the bar to catch it before standing up to full extension.
Why Push Jerk Is Essential for CrossFit Athletes
The push jerk CrossFit movement plays a vital role in various CrossFit workouts (WODs). Its importance is due to several factors:
- Full-body Power Development: The push jerk requires explosive power from the legs, core, and shoulders.
- Overhead Strength and Stability: This movement builds overhead strength while teaching athletes how to stabilize heavy loads.
- Efficiency: Learning how to dip under the bar rather than just pressing it overhead allows athletes to lift heavier weights more efficiently.
- Functional Fitness: The push jerk mimics real-life movements where you need to lift and stabilize objects overhead, making it a practical addition to functional training routines.
How to Do the Push Jerk CrossFit
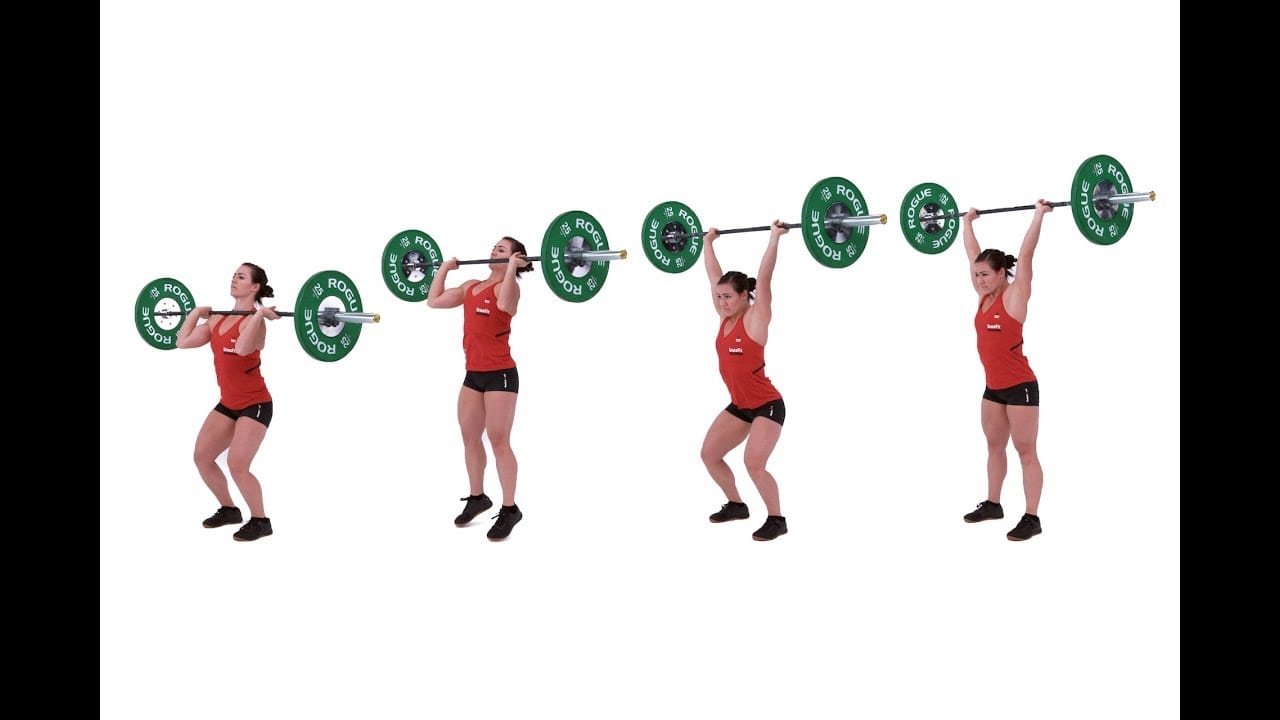
Step-by-Step Technique
- Starting Position:
- Stand with your feet shoulder-width apart.
- Hold the barbell in the front rack position with elbows slightly forward and the bar resting on your shoulders.
- Dip:
- Perform a quick dip by bending your knees slightly while keeping your torso upright.
- This dip helps generate momentum from your lower body.
- Drive:
- Drive through your heels, fully extending your hips, knees, and ankles to propel the barbell upward.
- Your arms should remain straight at this point as the bar moves overhead.
- Catch:
- As the barbell reaches its highest point, dip under it by slightly bending your knees and catching it in a partial squat with your arms locked out overhead.
- Stand Up:
- Once you’ve caught the bar overhead, stand up by fully extending your hips and knees, maintaining control over the barbell.
- Return to the Start:
- Lower the bar back to the front rack position and repeat.
Common Mistakes to Avoid
While the push jerk CrossFit movement looks simple, it’s easy to make mistakes that compromise form and safety. Avoid the following:
- Not Dipping Enough: Failing to dip under the bar after the drive can make it harder to catch and control the weight overhead.
- Incorrect Foot Position: Ensure your feet are properly aligned throughout the movement. Incorrect foot placement can destabilize your base.
- Over-arching Your Back: Maintain a strong core throughout to prevent hyperextension in your lower back.
Benefits of the Push Jerk for CrossFit Athletes
- Increased Lifting Capacity: The push jerk allows athletes to lift significantly heavier weights compared to a strict press or push press, making it a crucial movement for athletes aiming to increase their total strength.
- Improved Athleticism: Since the push jerk engages multiple muscle groups, it promotes coordination, balance, and explosiveness—traits essential in various athletic and functional movements.
- Time Efficiency in WODs: In CrossFit workouts, efficiency is king. The push jerk, when performed correctly, allows athletes to move more weight with less effort, saving valuable time during high-intensity WODs.
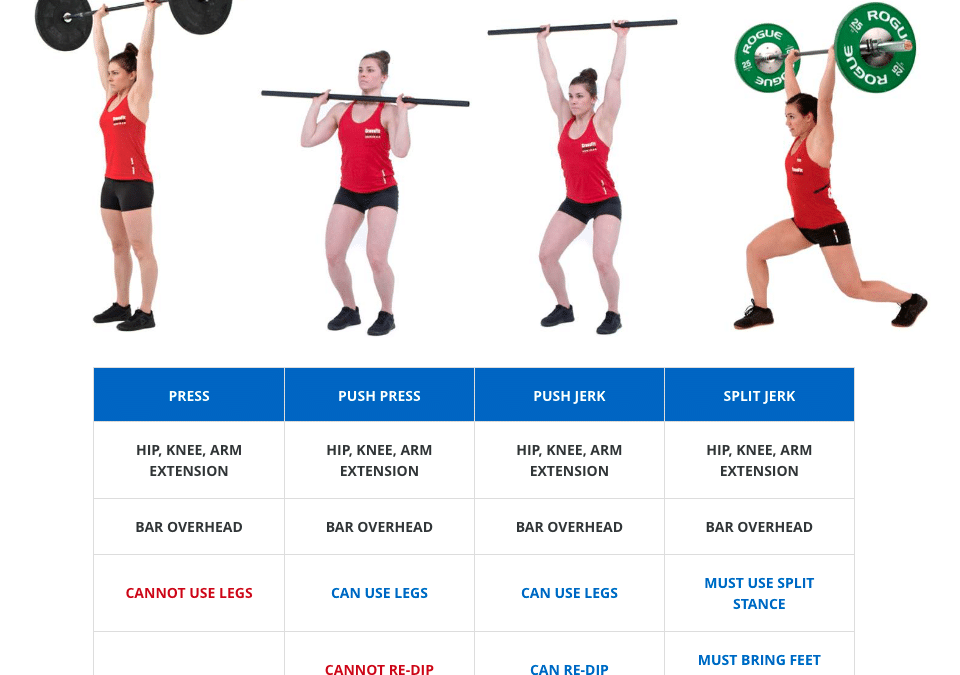
Push Jerk vs. Split Jerk
In CrossFit, athletes also practice the split jerk, another variation of the jerk. Here’s a quick comparison:
- Push Jerk: Requires athletes to catch the barbell with both feet planted and knees bent.
- Split Jerk: Involves stepping one foot forward and one foot backward to catch the bar overhead, offering more stability under heavy loads but requiring more technique.
Which One Should You Focus On? The push jerk is generally easier to learn, making it ideal for beginners. The split jerk, while more technical, allows for lifting heavier loads by offering greater stability in the catch position. Both variations are important, but mastering the push jerk lays the foundation for advanced lifting.
Push Jerk WOD Examples
If you’re ready to incorporate the push jerk CrossFit into your routine, here are some sample workouts that focus on this powerful movement:
WOD 1: Push Jerk Ladder
- 10-8-6-4-2 reps of push jerks
- Increase the weight after each set
- Complete each set as fast as possible with good form
WOD 2: Push Jerk AMRAP (As Many Rounds as Possible)
- 10-minute AMRAP:
- 5 Push Jerks (moderate weight)
- 10 Pull-ups
- 15 Air Squats
WOD 3: Push Jerk & Clean Complex
- 5 Rounds:
- 5 Clean and Push Jerks (heavyweight)
- 10 Burpees over the bar
- Rest 1 minute between rounds
These WODs will challenge your full-body coordination, endurance, and explosive power.
FAQ Section
What is a push jerk in CrossFit? The push jerk is a variation of the jerk, where athletes dip, drive, and re-dip under a barbell to catch it overhead with locked-out arms.
How do I improve my push jerk in CrossFit? To improve your push jerk, focus on perfecting your technique with lighter weights before gradually increasing the load. Also, incorporate accessory exercises like front squats and overhead presses to build strength in the legs and shoulders.
Is the push jerk safe for beginners? Yes, the push jerk can be safe for beginners if proper technique is followed. It’s essential to start with lighter weights and gradually progress as form improves.
How often should I practice the push jerk? Incorporate the push jerk into your routine 1-2 times per week, especially if improving overhead strength and power is a goal.
Why does CrossFit emphasize the push jerk? The push jerk allows athletes to lift heavier weights more efficiently by using the power from their legs, making it a key movement in CrossFit’s high-intensity workouts.
Push Jerk CrossFit: Drills and Progressions to Perfect Your Form
Once you’ve understood the mechanics of the push jerk CrossFit, it’s time to take your training to the next level with targeted drills and progressions. These steps are designed to refine your technique, strengthen key muscle groups, and ensure that you’re performing the movement as efficiently as possible. By incorporating these into your routine, you’ll not only improve your push jerk form but also boost your overall performance in other CrossFit exercises.
Why Drills and Progressions Matter
While simply practicing the push jerk CrossFit is valuable, focusing on drills and progressions breaks down the movement into smaller components. This approach allows athletes to identify weak points, correct form, and build the muscle memory needed to perform the movement at heavier weights or during high-intensity WODs. Drills also help improve mobility, coordination, and timing, which are critical for mastering the push jerk.
Key Drills for Mastering the Push Jerk CrossFit
1. Dip and Drive Drill
The dip and drive are the most critical phases of the push jerk CrossFit movement. Failing to execute this part correctly can make the lift much harder and compromise your stability when catching the barbell overhead. This drill isolates the dip and drive, ensuring that you’re generating maximum power from your legs.
How to Perform:
- Set a barbell in the front rack position, or use an empty bar if you’re working on form.
- Stand with feet shoulder-width apart.
- Perform a small dip by bending your knees, keeping your chest upright.
- Immediately drive up, fully extending your hips, knees, and ankles.
- Return to the start position and repeat without catching the bar overhead.
Focus Points:
- Keep your chest vertical during the dip.
- Drive explosively from your legs, ensuring full hip extension.
Benefits: This drill teaches athletes to use the legs and hips properly, which is essential for generating the power needed to jerk the bar overhead. It also helps correct common mistakes, such as leaning too far forward during the dip or failing to fully extend the hips during the drive.
2. Tall Jerk
The tall jerk is an advanced drill that focuses on the “catch” phase of the push jerk CrossFit. Many athletes struggle to dip quickly enough under the bar, causing them to catch it in a less stable position. The tall jerk forces you to move fast under the bar without relying on momentum from the dip or drive.
How to Perform:
- Start with a barbell in the front rack position, or use an empty bar for practice.
- Rise up onto the balls of your feet, with your arms already pushing the bar overhead.
- Without dipping, drive the bar straight up and simultaneously drop underneath it, catching it in a partial squat with arms locked out overhead.
- Stand up to full extension.
Focus Points:
- Focus on speed under the bar.
- Keep your core tight to maintain balance during the catch.
Benefits: This drill helps athletes practice the rapid dip under the bar and improves balance and timing in the catch position. It’s particularly useful for athletes who rely too much on their upper body to press the weight rather than using the legs for support.
3. Press Under
The press under drill is a progression that teaches athletes how to drop under the bar rather than press it overhead. It combines elements of the strict press with the catch phase of the push jerk CrossFit, helping athletes coordinate their upper and lower body movements.
How to Perform:
- Set up with a barbell in the front rack position, as if you were preparing for a push jerk.
- Press the bar upward but focus on dipping under the bar as you press.
- As the bar passes your forehead, dip into a partial squat to catch the bar in an overhead position.
Focus Points:
- Move your feet quickly to establish a solid base in the catch position.
- Use the legs to dip under the bar as soon as it moves past eye level.
Benefits: This drill helps athletes improve timing, balance, and stability in the catch phase, which is often where athletes struggle when performing the push jerk with heavy loads.
Strength Progressions for a Stronger Push Jerk CrossFit
While mastering the technique is essential, building strength is equally important if you want to lift heavier weights in your push jerk CrossFit. Here are some strength progressions to add to your routine.
1. Front Squats
Front squats are an excellent way to strengthen your legs, core, and upper back—all of which are critical for the push jerk CrossFit. A strong front squat will improve your ability to generate power during the dip and drive phase and will help you stabilize the barbell in the front rack position.
How to Perform:
- Set the barbell in the front rack position, with your elbows high.
- Squat down by bending your knees and hips, keeping your chest upright.
- Drive through your heels to stand back up.
Reps and Sets:
- 3-5 sets of 5-8 reps at a challenging weight.
Benefits: This exercise strengthens the quadriceps and core, making it easier to control the barbell during the dip and drive phase of the push jerk CrossFit.
2. Overhead Press
The overhead press, or strict press, helps build shoulder and triceps strength, which is crucial for stabilizing the bar in the overhead position during the push jerk CrossFit. While the push jerk relies more on leg power, upper body strength is still needed to support the weight overhead.
How to Perform:
- Stand with your feet shoulder-width apart and hold the barbell in the front rack position.
- Press the barbell overhead by extending your arms fully, keeping your core engaged.
- Lower the bar back down to the front rack position.
Reps and Sets:
- 3-4 sets of 5-6 reps at a moderate weight.
Benefits: This exercise strengthens the shoulders and triceps, helping you maintain control of the bar during the catch phase of the push jerk.
3. Pause Jerks
Pause jerks are a variation of the push jerk that adds a brief pause in the dip phase, helping athletes focus on their position before driving the bar overhead. This progression is great for athletes who struggle with maintaining proper form during the dip and drive.
How to Perform:
- Start with the barbell in the front rack position.
- Perform a dip as you would in a regular push jerk CrossFit but hold the bottom of the dip for 2-3 seconds.
- Drive the bar explosively overhead and finish the movement as usual.
Reps and Sets:
- 3-4 sets of 3-5 reps.
Benefits: The pause at the bottom of the dip helps athletes improve balance, control, and explosiveness in the push jerk. It also helps reinforce proper form during the initial phases of the movement.
How to Incorporate Push Jerk Drills and Progressions into Your CrossFit Training
To fully benefit from these drills and progressions, consider the following training tips:
- Focus on Technique Before Weight: Prioritize form and technique before increasing the load. Even if you’re eager to lift heavier, faulty form can lead to injury and stall your progress.
- Use Drills as Warm-ups: Start your push jerk workouts with some of the listed drills to ensure that you’re primed and ready to lift heavier loads with proper form.
- Incorporate Strength Movements on Separate Days: Include exercises like front squats and overhead presses on non-jerk days to avoid fatigue but build strength gradually.
- Track Your Progress: Keep a log of your weights, sets, and reps so you can monitor your improvements over time.
By incorporating these drills and progressions into your CrossFit routine, you’ll build the necessary strength, mobility, and coordination to master the push jerk CrossFit. As with any complex movement, consistency is key—so keep practicing and refining your form, and you’ll be lifting heavier in no time!
Conclusion
Mastering the push jerk CrossFit movement can significantly enhance your lifting capabilities and athletic performance. This movement not only builds upper body and core strength but also improves explosive power, which translates to better performance in a variety of WODs. Whether you’re new to CrossFit or an experienced athlete, focusing on proper technique and incorporating the push jerk into your workouts will yield noticeable improvements in your fitness.
Outbound Links:
- CrossFit Official Site
- WODwell – CrossFit WODs
- Rogue Fitness – CrossFit Equipment
- MobilityWOD – Mobility Resources
For more CrossFit tips and expert guidance, check out the rest of our blog at CrossFit Angier Blog.
At CrossFit Angier, we’re committed to helping our members unlock their full potential through tailored coaching, personalized training plans, and a supportive community. Whether you’re just starting or aiming to improve your skills, we have the programs and expertise to help you succeed.

